Breakout rooms allow you to split your SecureVideo meeting in up to 50 temporarily separate rooms. The meeting host can choose to split the participants of the meeting into these separate rooms while in session only, and can switch between rooms at any time. A participant can always leave an assigned breakout room and return to the main room, so only participants that would be allowed to see each other should be used in a breakout room scenario.
Only the host can assign participants to breakout rooms. Co-hosts can leave and join any breakout room only if they join a breakout room assigned to them by the host.
Users joined into the Zoom meeting from the Zoom Mobile App can participate in breakout rooms, but cannot manage them. Users joined using Chromebooks/Chrome OS are unable to join breakout Rooms, but the main room can be used as an alternative session for these users.
If you plan to use breakout rooms, it is recommended that "Show Participant Names in Group Zoom Sessions" in Account Options is set to "Yes". If this setting is set to "No", then the participant will not show any names, which will make it difficult to assign participants to breakout rooms correctly.
If the meeting is being cloud recorded, it will only record the main room, regardless of what room the meeting host is in. If local recording is being used, it will record the room the participant who is recording is in. Multiple participants can record locally.
Enabling breakout rooms
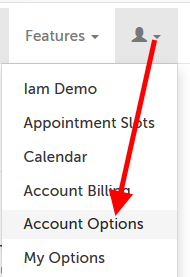
1. Click on the Profile icon in the upper right-hand corner, and select "Account Options" from the dropdown menu.
- If you are an Account Administrator with multiple users, "Account Options" is how you can change the default for all of your users. If you would only like to change this setting for yourself, click "My Options".
- If you are not an Account Administrator, you will only see "My Options" be able to change this setting for yourself.
- If you are the only user on your account, you will only see "Account Options" (since your settings cannot be different than the account).
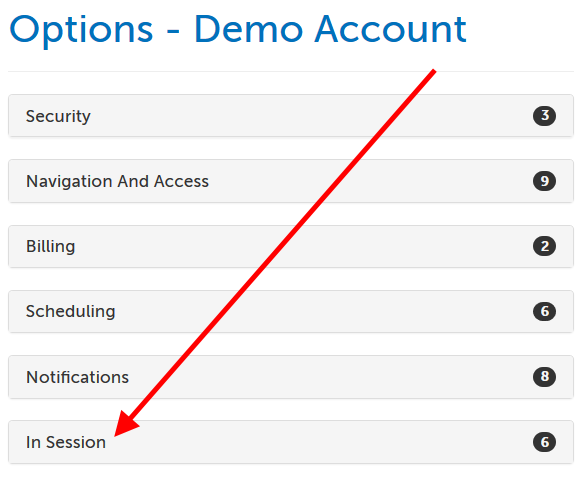
2. Expand the "In Session" section.
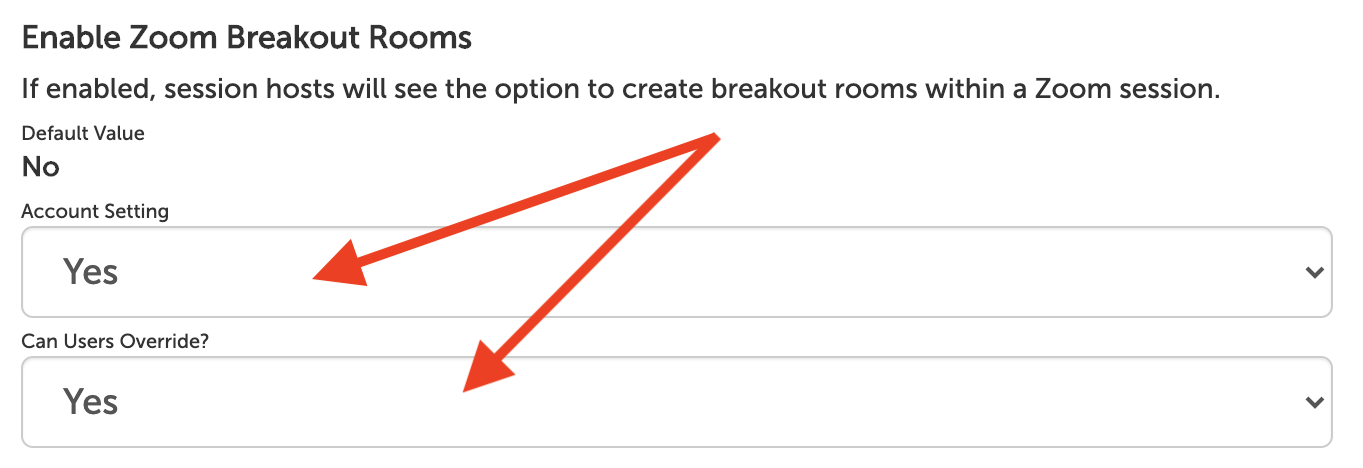
3. Scroll down to the "Enable Zoom Breakout Rooms" field. Click to change the account setting on the setting to change it. Changes will save automatically.
- If you are an Account Administrator, you can additionally choose if your users will have the ability to see and change this setting for themselves (without affecting other users).
- If you set "Can Users Override?" to "Yes", your users will be able to view and change this setting within "My Options".
- If you leave "Can Users Override?" to "No", your users will not see this setting within "My Options".
- If you are viewing "Account Options": "Default Value" in the upper right hand corner is a reminder of what the system default is. This does not change with your settings.
- If you are viewing "My Options": "Default Value" in the upper right hand corner is a reminder of what the account default is. This changes if an Account Administrator changes the account default in "Account Options".
Creating breakout rooms
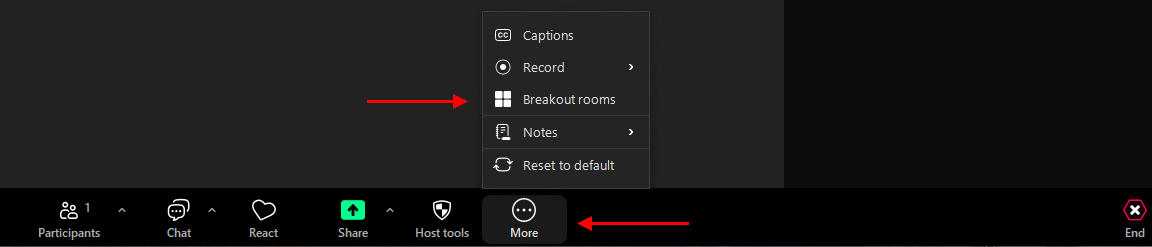
1. When in session, click "More" then "Breakout Rooms".
2. Select the number of rooms you would like to create, and how you would like to assign your participants to those rooms:
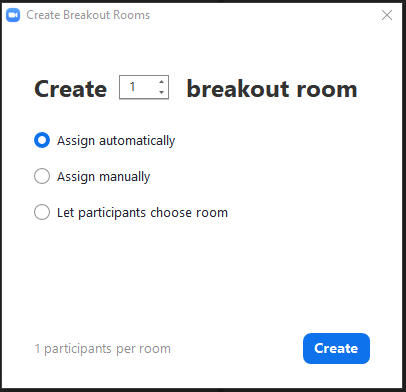
- Automatically: Let Zoom split your participants up evenly into each of the rooms.
- Manually: Choose which participants you would like in each room.
3. Click "Create".
4. Your rooms will be created, but will not start automatically. You can manage the rooms prior to starting them by following the instructions below.
Options for breakout rooms
1. After creating the breakout rooms, click "Options" to view additional breakout rooms options.
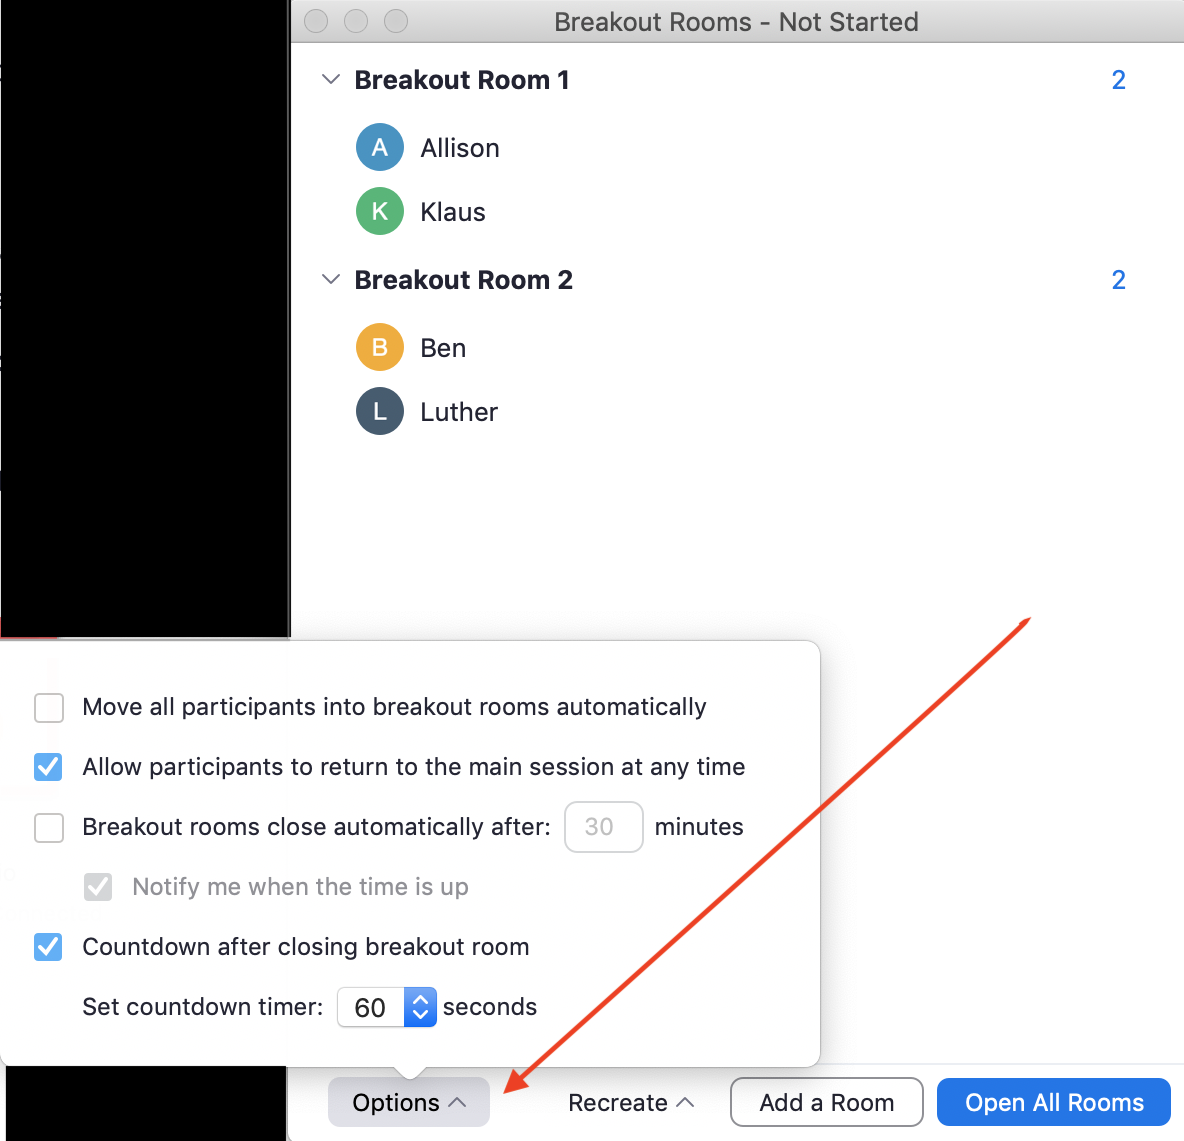
2. Check any options that you would like to use for your breakout rooms.
- Move all participants into breakout rooms automatically: Checking this option will move all participants into the breakout rooms automatically. If this option is unchecked, the participants will need to click "Join" to be added to the breakout room.
- Allow participants to return to the main session at any time: If this option is checked, the participants can move back to the main session from their meeting controls. If this is disabled, they need to wait for the host to end the breakout rooms.
- Breakout rooms close automatically after x minutes: If this option is checked, the breakout rooms will automatically end after the configured time.
- Notify me when the time is up: If this option is checked, the host will be notified when the breakout room time is up.
- Countdown after closing breakout rooms: If this option is checked, the participants will be given a countdown of how much time they have left before being returned to the main room.
3. Follow the steps below to assign participants to rooms or click "Open All Rooms" to start the breakout rooms.
Assigning participants to rooms
To assign participants to your rooms, select "Assign" next to the room you want to assign participants to and select participants you want to assign to that room. Repeat this for each room.

Once a participant has been assigned (manually or automatically), the number of participants will show in place of the Assign button.
Preparing breakout rooms
After manually or automatically assigning participants to rooms, you can rearrange the participants. Participants who are not assigned to breakout sessions will remain in the main meeting when the rooms are started.
- Move to (participant): Select a room to move the participant to.

- Exchange (participant): Select a participant in another room to swap the selected participant with.
- Delete Room: Delete the selected room.
- Recreate: Deletes existing breakout rooms and creates new ones.
- Add a Room: Add another breakout room.
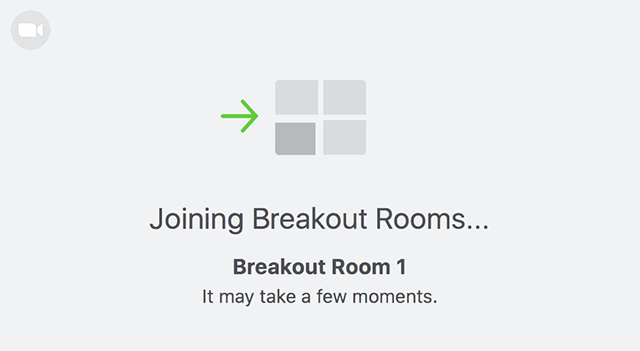
- Open All Rooms: Start the rooms. All participants will be moved to their respective rooms after confirming the prompt to join the breakout room. The host will be left in the main meeting until manually joining one of the rooms. The participants (and the host when manually joining a room) will see the following message shown when joining the breakout room.
Managing breakout rooms in progress
Once the breakout rooms have been started, the participants will be asked to join the Breakout Session. The host will stay in the main meeting until joining a session manually. If a participant has not joined the breakout room yet, it will be noted by (not joined) next to their name.
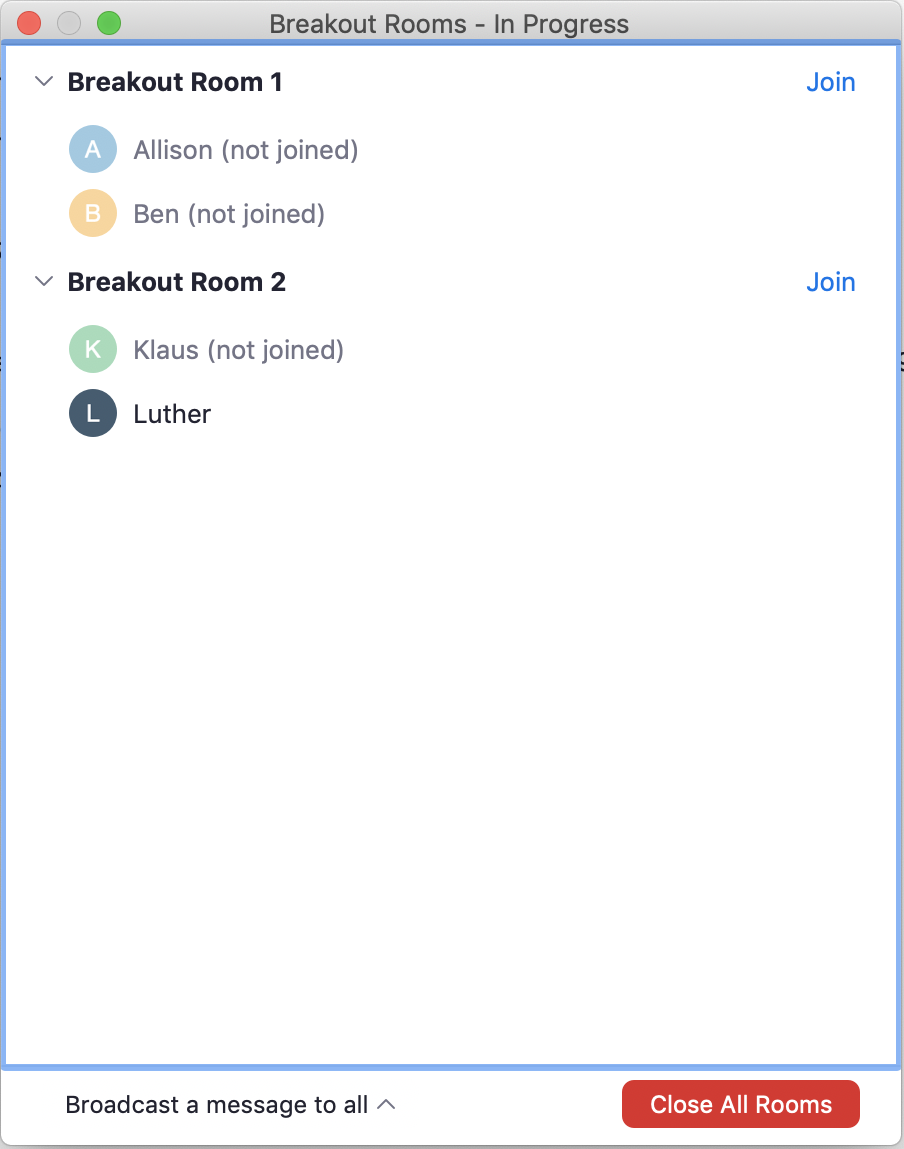
- Join: Join the breakout room.
- Leave: Leave the room and return to the main meeting (only shows when in a breakout room).
- Close All Rooms: Stops all rooms after a 60 second countdown, shown to the host and participants, and returns all participants back to the main meeting.
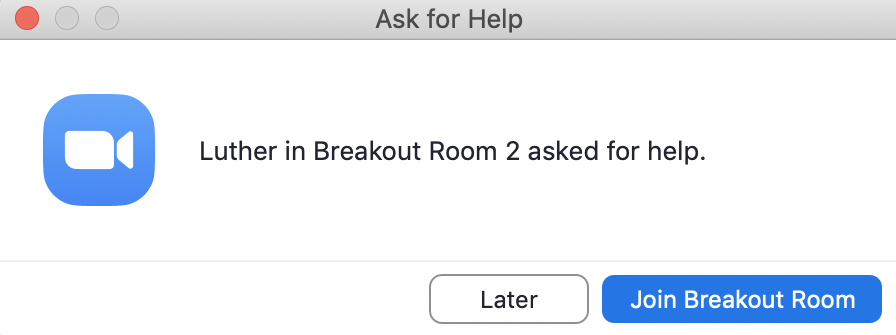
Responding to requests for help
Participants in breakout rooms can request that the meeting host join their meeting by clicking "Ask for Help". You will be prompted to join the room where the request originated from. Click "Join breakout room" to join the room.
Broadcasting a message to all breakout rooms
The host can broadcast a message to all breakout rooms to share information with all participants.
1. Click "Breakout rooms" in the meeting controls.
2. Click "Broadcast a message to all", enter your message and click "Broadcast".
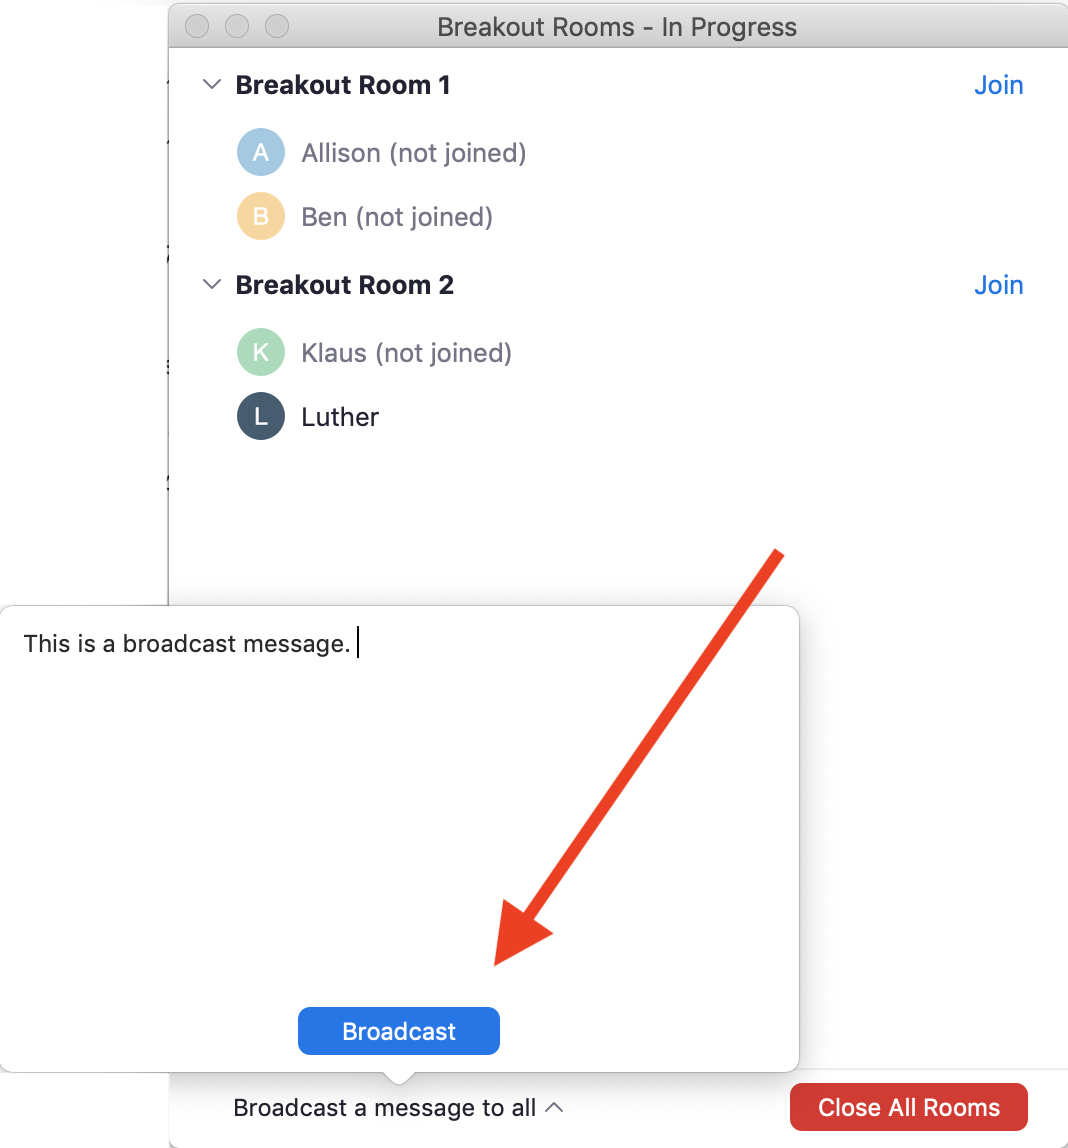
3. The message will now appear for all participants in Breakout Rooms.

This article was last reviewed by our Support team on December 8, 2020.